Work, Home and Family - Homemade Gifts, Part 2: Homemade Pin Cushion Container
I've been having problems getting my photos to upload to my computer right now, so I decided that I would put off summarizing (and showing photos) of what I have made and am making this month.
Instead, I thought I'd share some of what I made for Christmas 2015!
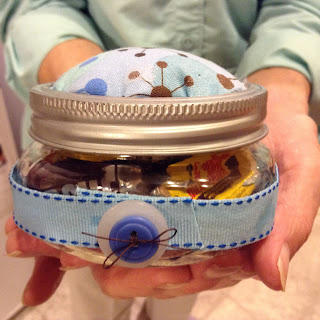
My children have a teacher who loves to sew, so we decided to make her this homemade pin cushion container that can hold pins on the top and other odds and ends - needles, extra buttons, etc. - in the bottom of the container.
Supplies:
* Canning jar with a ring and a lid (any size will work - I used a pint jam jar given to me by a friend that I wasn't planning on re-using)
* Scrap of fabric, slighter larger than the jar lid
* Batting or Stuffing or something that can act like these (an old knee-high nylon stocking will work well too!), enough to make a small mound on your jar lid
* Liquid Glue (I used craft glue, but school glue or adhesive like Krazy Glue or Gorilla Glue will work too)
* Ribbon, enough to wrap around the jar
* Button(s) (I used two)
* Coordinating Thread (optional - you can glue the buttons together instead)
* 4-6 Binder Clips
Trace around the lid on the scrap of fabric using a fabric pen, a scrap of hand soap or a pencil. Cut out the fabric slightly larger than the traced lid. Make sure its only slightly larger, too much extra fabric will keep you lid from fitting well later!
Glue the batting onto the center of the lid, leaving it "puffy" (in other words, don't squish it flat!). Make a line of glue around the outside edge of the lid. Place the cut scrap of fabric on top of the batting and press edges down onto the line of glue, keeping the edges in line with the edge of the lid. Use the binder clips to hold the fabric in place until the glue has dried.
While waiting for the glue to dry, glue ribbon around the jar, overlapping the ends. Stack buttons and sew together with the thread, tying the ends of the thread in a decorative bow (as shown) or gluing he loose ends behind the buttons for a more streamlined look. If you don't have thread, glue the buttons together and let dry or use one button. Glue the buttons onto the jar on top of the ribbon in the location of your choosing. To do this project without buttons, you could tie the ribbon around the jar instead or simply glue it on with the ends tucked under.
Once the glue on the lid has dried, place a ring of glue around the edge of the fabric and place into the rim. Allow the glue to dry so the rim and the lid are attached to each other. You may wish to set the lid on the jar UPSIDE DOWN so the lid and rim have a tight fit. A medium-weight object (such as a golf ball or something of similar size) can be placed on the lid to apply weight, creating a tighter seal with the rim. I didn't find this necessary, but if you're definitely looking for a tighter seal it works!
I filled the jar with chocolates but you can fill it with sewing notions or leave it empty as you like.
Place the lid on the jar and share your gift!
* My Cost: This gift cost me $0 to make since I already had all the items needed. The chocolates were left over from an event, so no extra money was spent on those either.
* Your Cost: Canning jars can vary in price or you may use a leftover jar that you already own and the rest of the notions can be purchased at places such as dollar stores or cut off of worn out clothing items. A spool of thread costs a couple of dollars full price at a fabric store and can be used for other projects as well. School glue (not glue stick) works for this project but does take longer to dry than the craft glue I used. Using adhesive glue, such as Gorilla Glue or Krazy Glue works but be careful to work quickly so you don't end up with extra glue on the materials.
What homemade gifts have you given lately?


